


How to Create the Perfect Volleyball Court: The Ultimate Guide
Introduction
Whether you are a seasoned volleyball player or part of a growing group of volleyball enthusiasts, learning How to Create the Perfect Volleyball Court and having a dedicated space to play can transform your experience. Building a high-quality playing area is more than just a DIY project; it is about creating a hub for fitness, social interaction, and athletic development. For many facility managers and homeowners, the decision to install a court is a strategic move that enhances the overall playing environment.
Table Of Content
- Introduction
- The Appeal: Why a Dedicated Court is a Game-Changer
- Purpose of the Guide: Elevating Your Game
- Types of Courts: Finding the Right Fit
- Phase 1: Planning and Site Selection
- Space Requirements and Regulation Dimensions
- Sun Orientation: The North-South Rule
- Surface Evaluation: Flatness and Drainage
- Permits, Utilities, and Regulations
- Phase 2: Excavation and Drainage (The Foundation)
- The Dig: Establishing the Depth
- Water Management: French Drains and Grading
- Ground Stabilization: Landscaping Fabric
- Phase 3: Material Selection
- Choosing the Right Sand (For Beach Courts)
- Base Layers: The Role of Gravel
- Grass and Hardcourt Alternatives
- Phase 4: Equipment and Net Installation
- Pole Setup: Materials and Stability
- Net Specifications and Regulation Heights
- Boundary Lines and Court Markings
- Phase 5: Finishing Touches and Accessories
- Safety Features and the “Out-of-Bounds” Zone
- Night Play: Lighting Requirements
- Spectator Comfort and Amenities
- Maintenance for Longevity
- Sand Care: Raking and Fluffing
- Equipment Check: Stability and Tension
- Drainage Maintenance: Protecting the Foundation
- Conclusion
- The Reward: A Lasting Legacy for the Game
- Final Tip: Build for the Future
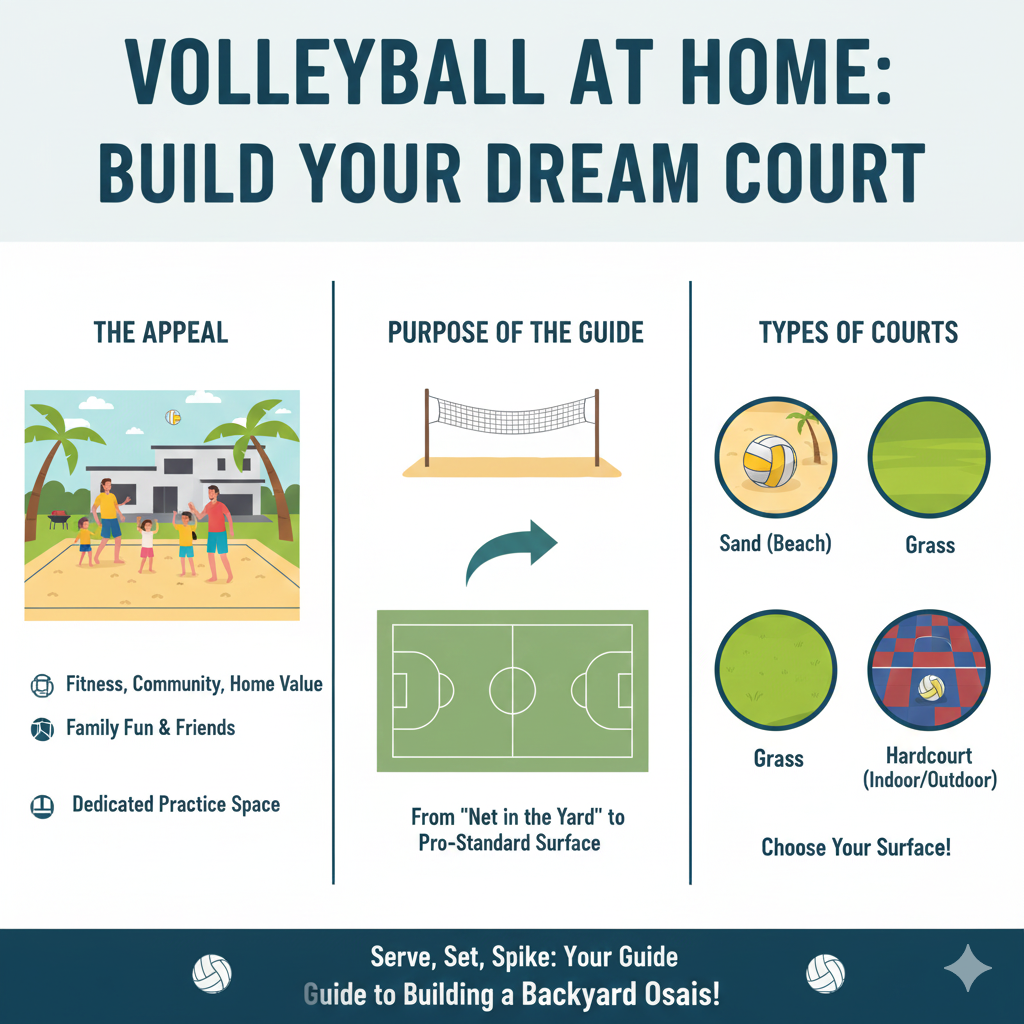
The Appeal: Why a Dedicated Court is a Game-Changer
A dedicated Outdoor Volleyball Court or even a professional-grade indoor space offers much more than a place to exercise. It serves as a cornerstone for building a volleyball team and fostering a sense of community. For families, it is an investment in health and home value; for a Sports Facility, it ensures that athletes have access to quality flooring and a safe environment.
By having a permanent playing surface, you eliminate the hassle of temporary setups. This allows for competitive matches at any time, encouraging fair play and consistent practice. Whether you are aiming for the level of Professional courts or a high-quality backyard setup, the presence of a structured court signals a commitment to the sport.
Purpose of the Guide: Elevating Your Game
The goal of this guide is to help you transition from a casual net in the yard to a space that meets Standard Volleyball Court Dimensions. Achieving the perfect volleyball court involves understanding the technicalities of court layout, including the correct net height and precise court markings.
When you move toward a professional-standard playing surface, you are not just focused on the aesthetics; you are prioritizing player safety. This guide will cover how to manage available space efficiently, ensuring there is enough free space for a powerful jump serve and safe movement. We will walk through the importance of a solid base layer, the necessity of proper drainage, and how to select a volleyball net that stands the test of time.
Types of Courts: Finding the Right Fit
Before digging into the soil or laying down tiles, you must decide which type of court suits your needs. Each variety has its own set of Beach Volleyball Court Dimensions or indoor requirements.
- Sand (Beach) Courts: Popular for their low impact on joints and high caloric burn. They require specific Beach Volleyball Court Dimensions and a deep base layer of sand to ensure a soft landing.
- Grass Courts: Often the easiest to set up in a backyard, but they require regular maintenance to keep the grass level and avoid significant wear and tear.
- Hardcourts (Indoor/Outdoor): Common in a High School or professional Sports Facility. Indoor courts focus heavily on shock absorption and ceiling height, whereas outdoor hardcourts might share space with a basketball court.
Moving into the technical aspects of the project, Phase 1 is perhaps the most critical for ensuring long-term satisfaction. Cutting corners during the planning stage can lead to structural issues or a subpar playing environment.
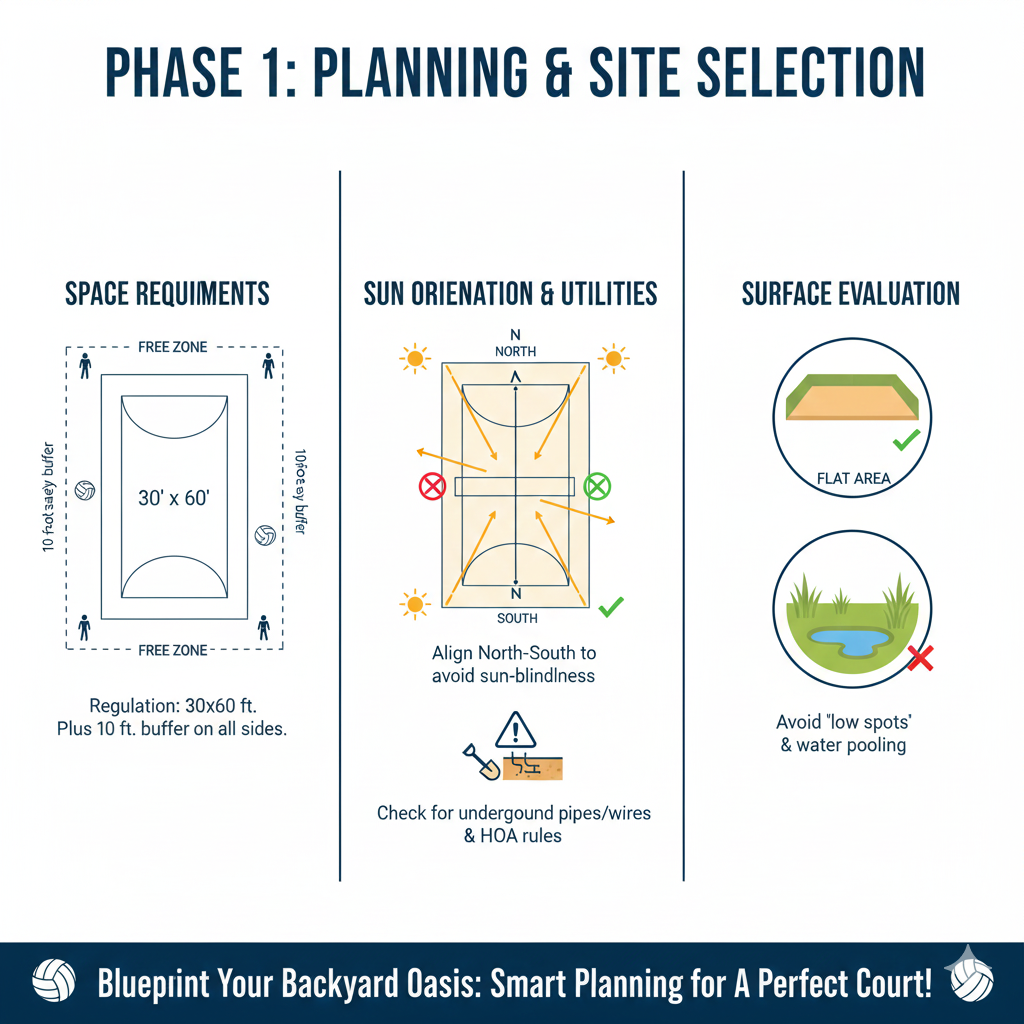
Phase 1: Planning and Site Selection
Before you break ground, you must evaluate your available space to ensure it can accommodate the official volleyball court dimensions. Planning with a volleyball player in mind means considering not just the lines, but the entire atmosphere of the game.
Space Requirements and Regulation Dimensions
To build a professional-grade facility, you must adhere to a specific Court Size. The standard regulation dimensions for a volleyball court are 30 feet by 60 feet. However, a common mistake for volleyball enthusiasts is only measuring the court itself.
You must also account for the free zone. This is a safety buffer that extends at least 10 feet beyond the boundary lines on all sides. This extra free space is essential for player safety, allowing athletes to pursue a stray ball without colliding with fences or equipment. If you are building this as part of a larger Sports Facility, ensuring these clearances is a requirement for hosted competitive matches.
Sun Orientation: The North-South Rule
One of the most overlooked aspects of an Outdoor Volleyball Court is the position of the sun. To maintain fair play, you should align the court in a North-South direction. This orientation ensures that the sun stays out of the eyes of the players during the peak hours of the day, particularly during a high-stakes jump serve. An East-West orientation often leaves one side at a significant disadvantage, which can ruin the competitive spirit of the game.
Surface Evaluation: Flatness and Drainage
When choosing the location, perform a thorough surface evaluation. You are looking for a naturally flat area to minimize the cost of leveling. Avoid “low spots” where water naturally pools, as this will lead to a muddy playing surface or saturated sand. Even with proper drainage systems in place, starting on a slight natural incline or a high point on your property will drastically improve the longevity of your base layer and prevent premature wear and tear.
Permits, Utilities, and Regulations
Before you begin the excavation for your base layer, contact your local utility companies to mark any underground power lines, water pipes, or gas lines. If you are a homeowner, check with your HOA to ensure your volleyball court meets their guidelines regarding fences or night lighting. For facility managers, ensuring that the court layout complies with local building codes is the first step toward a successful installation.
Building a court that lasts requires more than just a surface; it requires a solid engineering foundation. Phase 2 focuses on the “unseen” work that prevents your investment from turning into a swamp after the first rain.
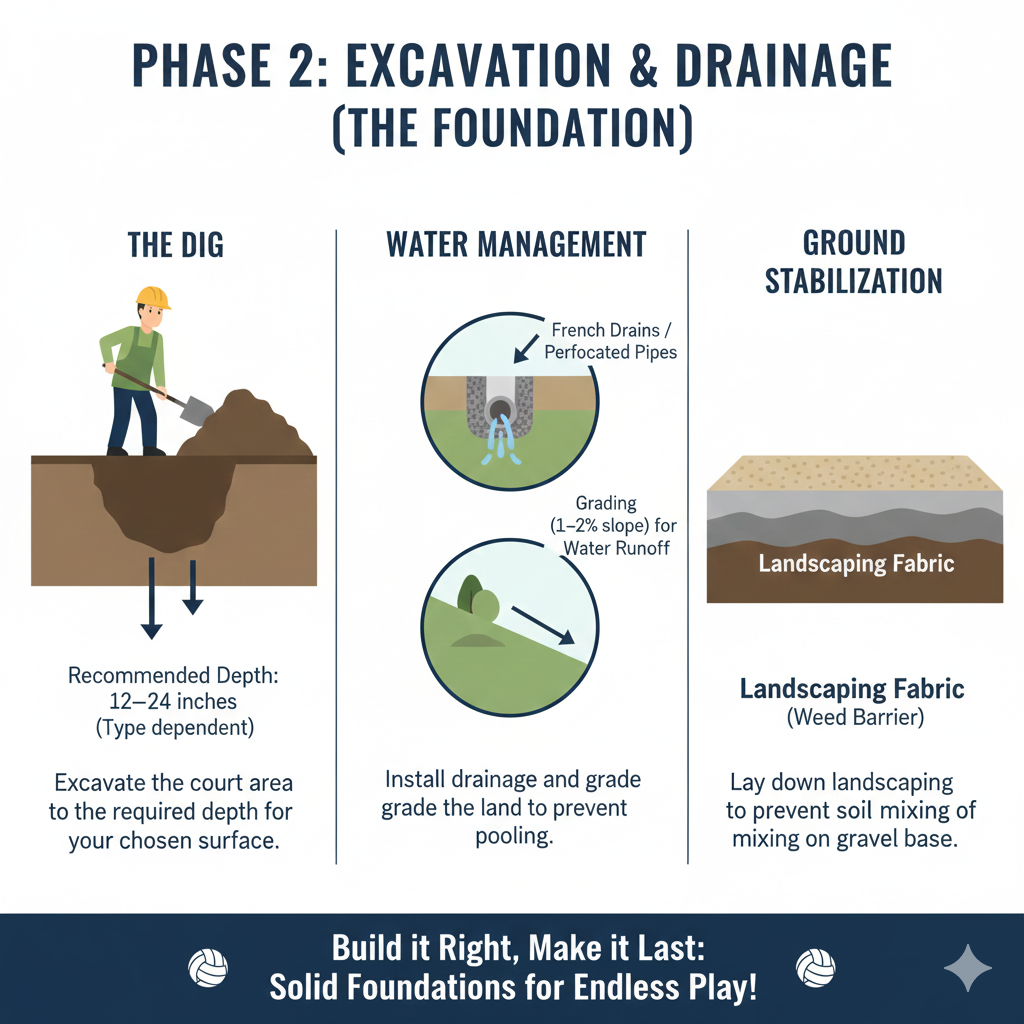
Phase 2: Excavation and Drainage (The Foundation)
Once you have mapped out your Court Size and accounted for the free zone, it is time to start the heavy lifting. The longevity of your playing area depends entirely on how well you prepare the earth beneath it.
The Dig: Establishing the Depth
The excavation process is where the physical transformation begins. For a professional Outdoor Volleyball Court, the recommended depth for “The Dig” typically ranges between 12 to 24 inches. This depth varies based on your local soil type and whether you are building a sand or grass court. You must ensure the bottom of the pit is level before adding any materials to maintain a consistent playing surface depth. For indoor courts, this stage involves ensuring the subfloor is ready for quality flooring and specialized shock absorption layers.
Water Management: French Drains and Grading
Water is the greatest enemy of any outdoor sports surface. To achieve proper drainage, you should install a system of perforated pipes or “French drains” at the base of your excavation. These pipes should lead away from the court to a lower point on your property.
To assist the pipes, the floor of your excavation should have a subtle grading—typically a 1% to 2% slope from the center line toward the sidelines. This ensures that gravity naturally moves moisture toward the drainage pipes, preventing “dead spots” where the ball bounce might become inconsistent due to soggy ground.
Ground Stabilization: Landscaping Fabric
Before you begin pouring your base layer of gravel, you must install a heavy-duty landscaping fabric, often referred to as a weed barrier. This step is vital for ground stabilization. The fabric acts as a filter that allows water to pass through into the drainage system while preventing the native dirt and mud from mixing with your clean gravel or sand. Without this barrier, the dirt will eventually migrate upward, contaminating your playing surface and ruining the “fluff” of a sand court or the stability of a grass one.
Following these steps ensures that your court remains a professional-grade Sports Facility that can withstand heavy use and weather, minimizing future wear and tear.
Selecting the right materials is what separates a professional playing area from a standard backyard project. In this phase, we focus on the textures and layers that define the game’s feel and player safety.
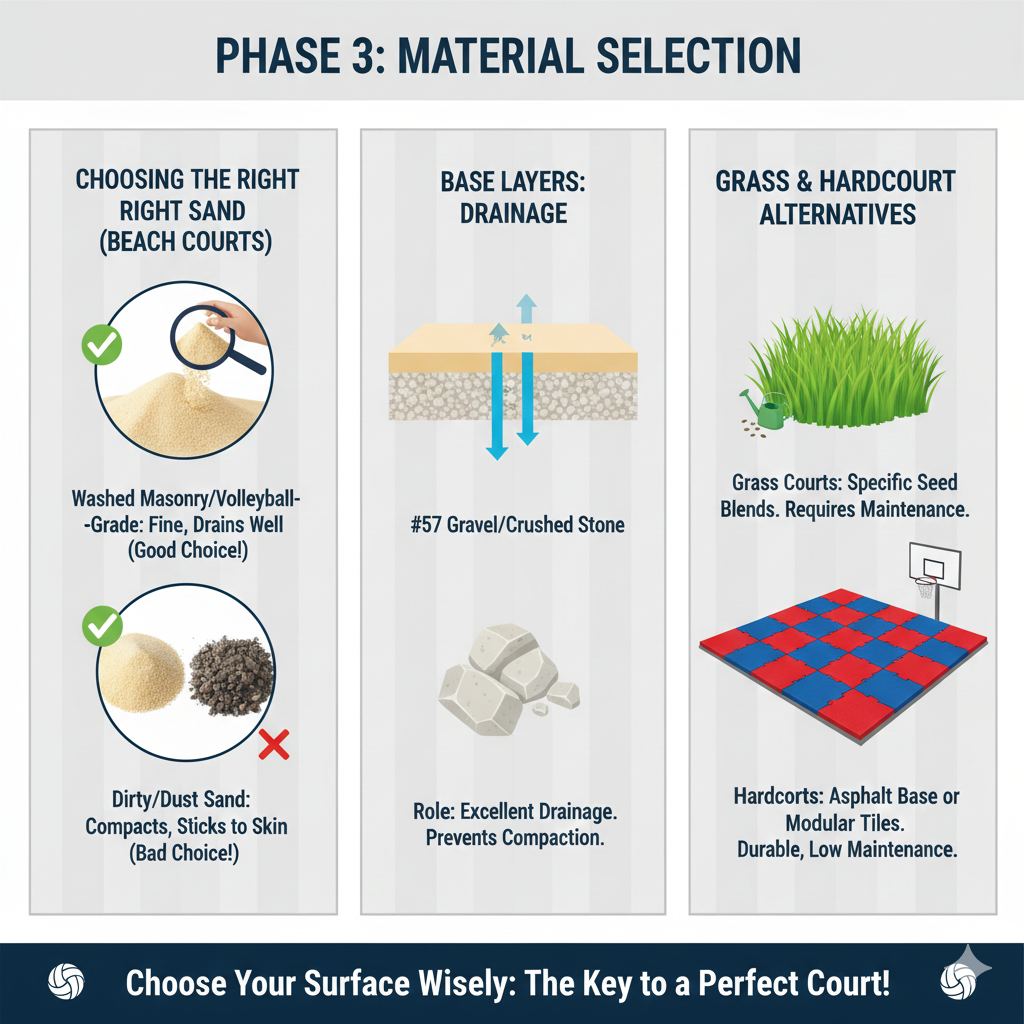
Phase 3: Material Selection
The quality of your materials directly impacts the playing environment and the long-term durability of the court. Whether you are building for a High School or a private residence, the goal is to minimize wear and tear while maximizing performance.
Choosing the Right Sand (For Beach Courts)
If you are following Beach Volleyball Court Dimensions, the sand is your most important investment. You must prioritize “Washed Masonry” or specific “Volleyball-Grade” sand. This type of sand has been rinsed to remove silt and clay, ensuring it doesn’t turn into hard-packed mud when wet.
High-quality sand should be sub-angular to rounded; this prevents it from compacting too tightly and ensures it doesn’t stick excessively to the skin of a volleyball player. Avoiding “dirty” or “dusty” sand is crucial for player safety, as dust can cause respiratory discomfort during high-intensity competitive matches. For a truly perfect volleyball court, the sand should be deep enough to provide natural shock absorption during a dive or landing.
Base Layers: The Role of Gravel
Beneath your sand or surface lies the base layer, which is the engine of your proper drainage system. Experts recommend using #57 gravel or clean crushed stone. This size of gravel provides enough structural gaps to allow water to flow freely into your French drains. For a professional Sports Facility, this layer is usually about 4 to 6 inches thick. It acts as a stable foundation that prevents the playing surface from shifting over time, maintaining the integrity of your court layout.
Grass and Hardcourt Alternatives
Not every volleyball team wants to play in the sand. If you prefer a grass court, selecting the right seed type—such as Bermuda or Kentucky Bluegrass—is essential for a durable turf that can handle the constant pivoting and jumping.
For those looking into indoor courts or permanent outdoor hardcourts, materials like asphalt or modular athletic tiles are the standard. Modular tiles are particularly popular for Professional courts because they offer built-in shock absorption and can be installed over an existing basketball court. These surfaces are ideal for maintaining consistent ball bounce and ensuring the ceiling height (for indoor builds) is maximized for high-arching sets.
For more technical specifications on sports-grade materials, you can refer to the FIVB Official Volleyball Rules for international surface standards.
With the foundation and materials in place, we move into the structural phase. This is where the physical boundaries of the game are defined, ensuring the setup meets the Standard Volleyball Court Dimensions and provides a professional experience for every volleyball player.
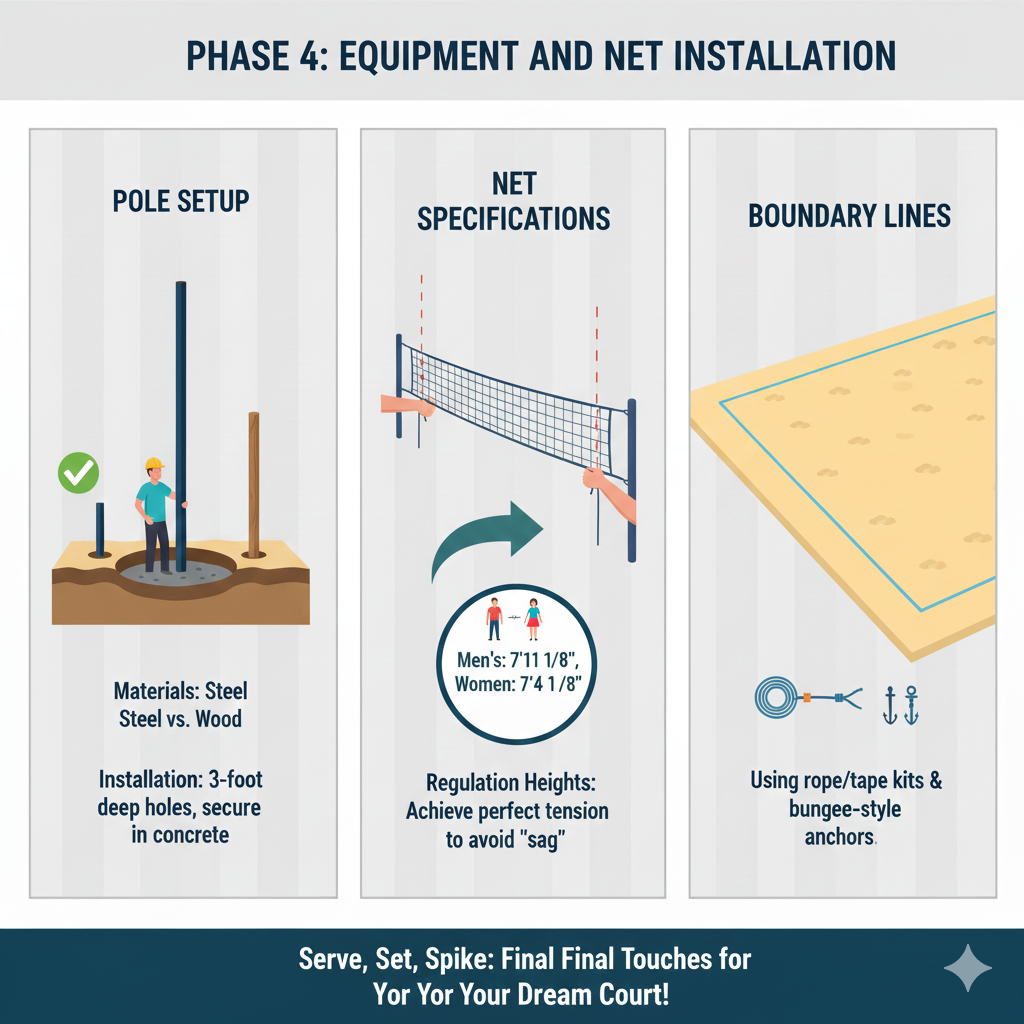
Phase 4: Equipment and Net Installation
The equipment you choose will determine the stability of your setup during high-intensity play. Whether you are building for a High School or a professional Sports Facility, the installation of the poles and net is a permanent fixture that requires precision.
Pole Setup: Materials and Stability
Choosing the right poles is vital for maintaining net tension.
- Steel: The most durable option, ideal for indoor courts or permanent outdoor setups where weight isn’t a concern.
- Aluminum: Lightweight and resistant to rust, making it the preferred choice for an Outdoor Volleyball Court.
- Wood: A budget-friendly DIY option, though it is more prone to weathering and wear and tear.
For a professional-grade installation, you must dig holes at least 3 feet deep. Secure the poles in concrete to ensure they can withstand the horizontal pull of a tight volleyball net. This stability is crucial for player safety, as it prevents the poles from leaning or snapping during competitive matches.
Net Specifications and Regulation Heights
To ensure fair play, the height of the net must be exact. According to official standards, the net height for men’s competition is 7’11 5/8” (2.43m), while for women’s competition, it is 7’4 1/8” (2.24m).
Achieving the perfect net tension is an art. A sagging net disrupts the game and affects the ball bounce when the ball hits the tape. Use a winch system to pull the volleyball net taut, ensuring the top cable is rigid. This allows for a clean “net-in” play and maintains the professional feel of your playing area.
Boundary Lines and Court Markings
Defining the playing area requires accurate line markings. Use high-quality rope or tape kits to establish your boundary lines. This includes the sidelines and the end line. In a professional court layout, these lines are 2 inches wide.
To keep the lines from shifting during a jump serve or a dive, secure them with bungee-style anchors. These allow the lines to give slightly underfoot without snapping. Within these boundaries, you must also mark the center line, which sits directly under the net, and the attack line (the 3-meter line).
One of the most critical areas to mark is the service zone. This is the area behind the end line where the player stands to serve. In the official volleyball court dimensions, the service zone extends the full width of the court. Ensuring these court lines are crisp and high-contrast is essential for both officials and players to make accurate calls.
Once the infrastructure is set, the focus shifts to the details that transform a functional space into a high-end Sports Facility. These finishing touches are essential for accommodating various skill levels and ensuring the court remains a safe, welcoming environment for every volleyball player.
Phase 5: Finishing Touches and Accessories
The final phase of building the perfect volleyball court involves optimizing the area for safety, visibility, and the overall experience of both the volleyball team and their fans.
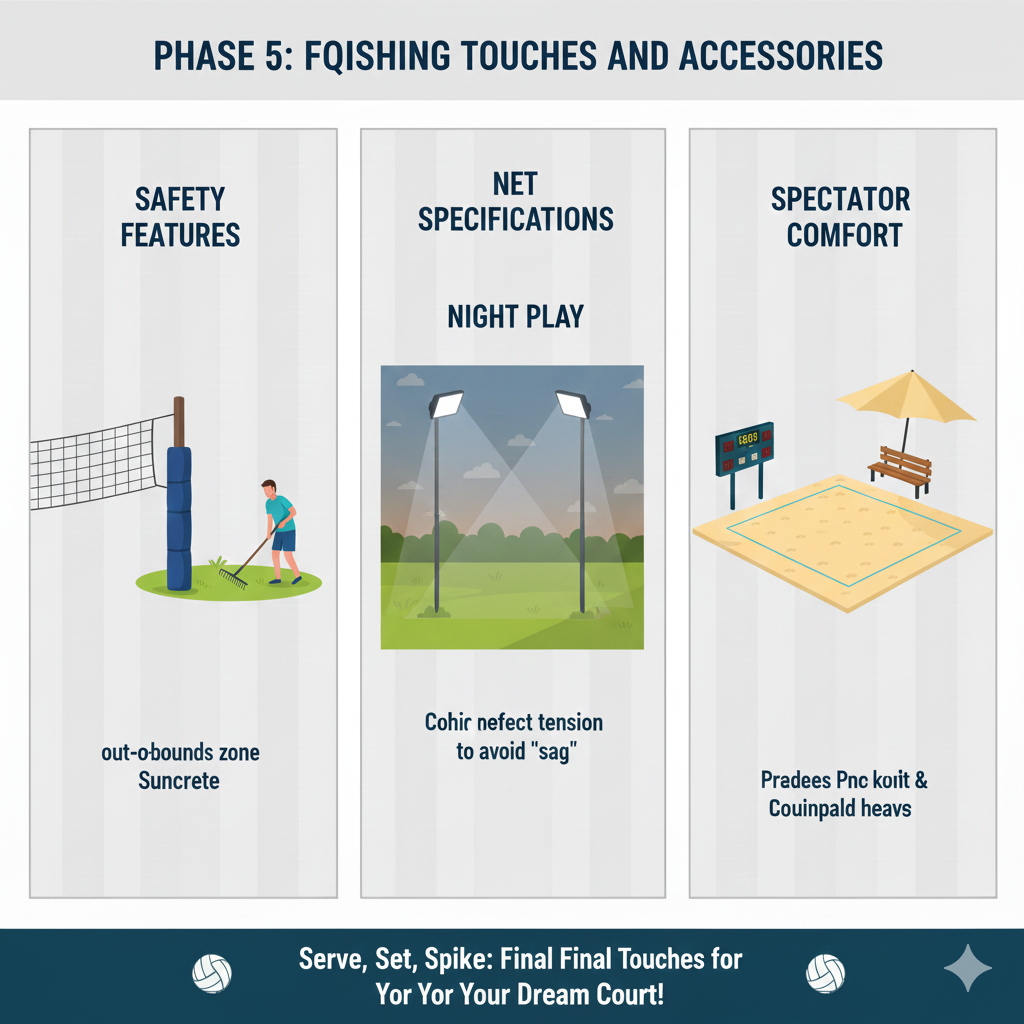
Safety Features and the “Out-of-Bounds” Zone
Player safety should remain a top priority even after the net is up. One of the most critical safety additions is pole padding. Even with the poles set outside the sidelines, high-speed plays often lead players toward the equipment. Professional-grade, weather-resistant padding can prevent injuries during competitive matches.
Additionally, ensure that the “out-of-bounds” zone or free zone is completely clear of obstacles. This area should be level with the playing surface to prevent tripped players. For indoor courts, this means ensuring no storage bins or benches creep into the free space. For an Outdoor Volleyball Court, keep the perimeter free of large rocks or landscaping features that could pose a hazard during a deep pursuit of the ball.
Night Play: Lighting Requirements
To maximize the utility of your court, installing a lighting system is a must. Modern LED floodlights are the gold standard for Outdoor Volleyball Court setups because they provide bright, even coverage with minimal energy consumption.
When positioning lights, aim for high poles (at least 20 feet) located at the corners or sides to minimize glare. Proper lighting ensures that the attack line and boundary lines are clearly visible, allowing for fair play long after the sun goes down. If you are a facility manager, ensuring the lighting meets foot-candle requirements for sports is a key step in professional certification.
Spectator Comfort and Amenities
A great court isn’t just for the players; it’s for the community. To truly cater to volleyball enthusiasts, consider adding amenities that enhance the viewing experience:
- Seating: Install bleachers or weather-proof benches outside the free zone.
- Scoreboards: A manual or digital scoreboard helps keep the focus on the game and adds a professional touch to the court layout.
- Shade Areas: For beach courts, adding pergolas or large umbrellas helps players and spectators manage heat between sets.
By integrating these features, you create a professional playing environment that rivals Professional courts.
To wrap up your guide to How to Create the Perfect Volleyball Court, we must look at the long-term care of your investment. Building the court is only half the battle; ensuring it stays in peak condition is what guarantees a professional-grade playing environment for years to come.

Maintenance for Longevity
Even Professional courts require regular maintenance to counteract the natural wear and tear caused by intense gameplay and weather. By following a consistent schedule, you ensure that the official volleyball court dimensions and safety standards remain intact.
Sand Care: Raking and Fluffing
For those with a beach setup, the playing surface requires constant attention. Over time, sand can become compacted, which reduces its natural shock absorption and increases the risk of injury for a volleyball player.
- Raking: Regularly rake the sand from the sidelines toward the center to prevent it from thinning out near the boundary lines.
- Sifting: Use a fine-mesh sifter to remove debris, rocks, or organic matter that might have settled in the service zone.
- Fluffing: Occasionally “fluff” the sand to a depth of 12 inches to ensure that when a player lands after a jump serve, the landing is soft and safe.
Equipment Check: Stability and Tension
Weather events can wreak havoc on your hardware. After heavy winds or rain, check the post-stability of your poles. Even concrete-set poles can shift slightly, affecting the court layout. It is equally important to inspect your volleyball net and net tension. Constant exposure to UV rays and rain can cause the net fibers to degrade. Ensure the net height is still at the regulation height of the net for your specific skill levels. If the top cable has slack, use your winch to pull it taut, ensuring the ball bounce off the net remains predictable.
Drainage Maintenance: Protecting the Foundation
The most critical “unseen” maintenance is ensuring proper drainage. Over time, silt and organic buildup can clog your French drains or perforated pipes.
- Periodically check the exit points of your drainage system to ensure water is flowing freely.
- Keep the area around the center line and attack line clear of standing water after storms.
- If you notice the playing area is slow to dry, you may need to flush the pipes to clear any obstructions in the base layer.
Building a professional-grade space for athletics is a significant undertaking, but the results are undeniably worth the effort. By following the technical steps outlined in this guide, you ensure that your project meets the highest standards of the sport.

Conclusion
The Reward: A Lasting Legacy for the Game
A well-constructed court offers rewards that extend far beyond the physical structure. For facility managers and homeowners alike, it provides a reliable playing environment that promotes health, teamwork, and community spirit. When you adhere to official volleyball court dimensions and invest in quality flooring or high-grade sand, you create a venue where a volleyball player can truly excel.
A court that prioritizes player safety and fair play becomes a hub for competitive matches, fostering the growth of every local volleyball team. Moreover, a project that successfully balances Court Size with necessary free space significantly boosts property value and the professional reputation of any Sports Facility.
Final Tip: Build for the Future
If you are feeling overwhelmed by the process, remember the golden rule of construction: start with the essentials but never compromise on the foundation. While you can always upgrade your volleyball net or add luxury seating later, you cannot easily fix poor proper drainage or a low-quality base layer once the court is complete.
Prioritize the “hidden” elements—the excavation depth, the landscaping fabric, and the sand quality—to protect your court from premature wear and tear. By keeping the Standard Volleyball Court Dimensions in mind and focusing on a solid court layout, you are well on your way to creating the perfect volleyball court.
Now that the structure is set, it’s time to work on your jump serve and enjoy the game. For more insights on mastering the sport on your new surface, check out how to play volleyball to sharpen your skills.


